
CYCLING: First steps with a power meter
Basic concepts to train cycling with a power meter.
A power meter has become a must to have tool for any cyclist or triathlete that follows a structured training. It provides information about our mechanical performace, while the heart rate, VO2 and lactate provides a physiological understanding.
Those "data channels" have a linear or curve behaviour when showed in graphs and it's an art to make them match. We are able to do so with hours of practice coach/athlete.
The coach explains what are the effects of doing something while the athlete feels it on the bike and associates to effort (RPE) or data shown in the bike computer (HR, power and cadence).
There is other crucial data that we do not have access on our bike computer like the VO2 and lactate, which is the more important by the way. So we get those values in the LAB or camp testing and we associate that to a "power" in the best way we can. At the end we are humans not machines 🙂
Keep reading to undertand the whole process, this article is gold value.
Introducing the physiological effort
Cycling it's known for being a non-impact sport, so we can expend more time in practice like others as running for example.
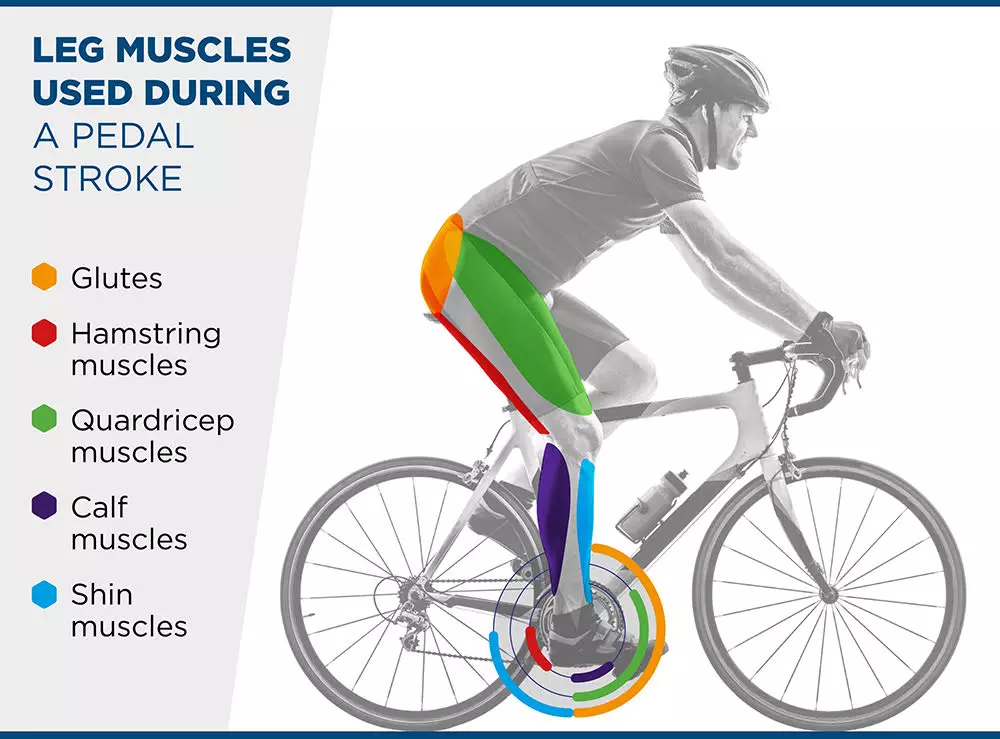
The form of transfering our body energy to the bike drivetrain is by a circular movement that implicates a muscle work depending on the point of the circle.
PRO cyclists have a strong glutes and hamstrings essencially, while beginners use too much their quads and knees to push the pedals.
All PRO cyclists work a lot their strength to balance their muscles and improve their stability, avoiding knee and back pain.
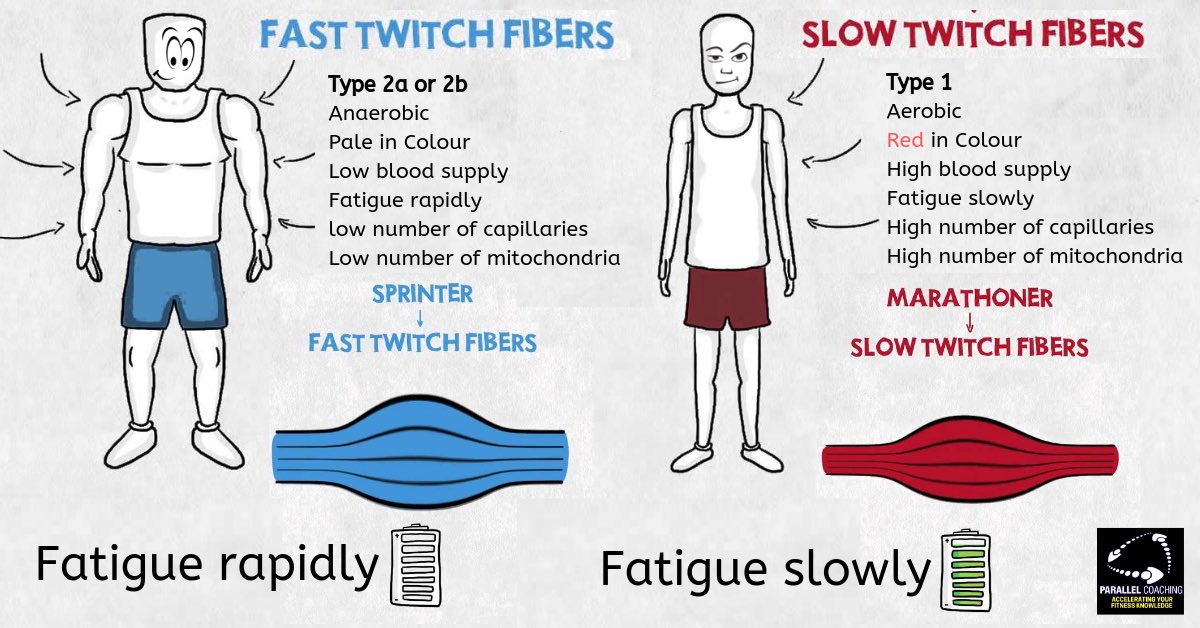
Our muscles are composed of filaments (fibers) connected to the blood system and nervous system. This way we achieve fueling and activation to make them move.
- A muscle can contract fast or slow.
- A muscle can be stronger or weaker.
- A muscle can work over a time before getting compromised by the fatigue.
Although the muscles can be trained of course to perform better in a way or another, there is a huge component of genetics, but also how they form during our childhood.
It depends on the gender, age, genetics and training.
As we have seen there are lots of factors that classify us in a certain class of athletes. In terms of cycling, we want to have good aerobics in the majority of divisions (except track cycling).
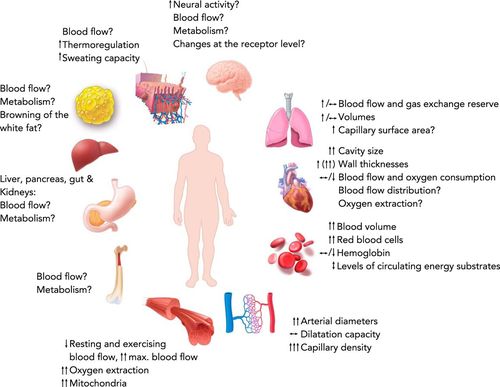
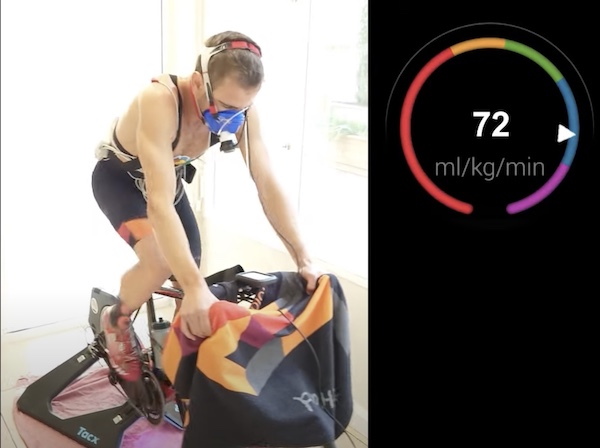
We can know quickly the potential of a cyclist by testing his/her VO2max, which is the maximum oxygen volume that can transport or being used.
One thing is how much air you can breath, and other how much of it oxygen you can take advantage. At the point that we exhale more CO2 than O2 inhaled, we will last a few minutes before dropping the intensity.
In a LAB we can test our limits to know how many liters of oxygen we can achieve in a maximum effort. If we divide those liters by our weight, we get the famous VO2max relative number.
The VO2max is considered the gold standard of performance to know an athlete physiology and can be used to compare different individuals.
Of course it doesn't mean that a 70mL/kg·min will never beat a 75mL/kg·min. But obviously to reach a PRO level it's a must to have a minimum value of it.
The VO2max can be improved around 10-20% relatively fast with an 8-week cycle training block, but it's also lost at the same time without a maintenance.
There are many other physiological indicators to know performance and fatigue conditions, it is a whole science!
PRO athletes are in very good hands and have plenty of tools to monitor their achievements over the years. For our power meter article this is the basics that should know to understand the next steps.
The drivetrain physics
Once we have a "physiological status", we focus on pedaling. We do so while pushing our crankset following a circular movement.
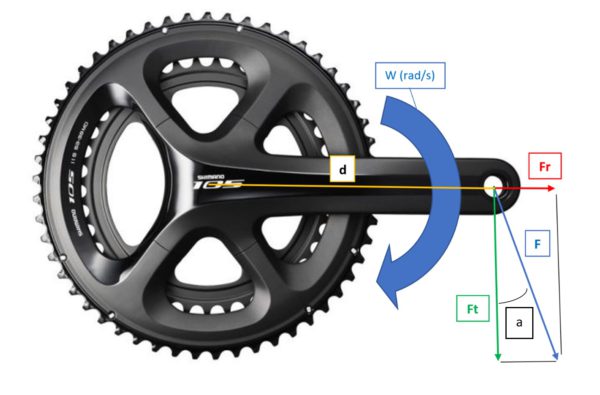
Going back to school, the cranks will move through a force [F] perpendicular to the axis of movement, generating an angular velocity [w]. Coach Oriol demonstrates how a Torque is generated by applying the force with a leverage [d] which is our crank size (bikefitting for it).
Torque = F x d [N·m]
Now the cranks start to move and the angular velocity (w) enters the game, while the force vector is always perpendicular to our axis. Movement means a power generated, as easy as that. No movement no power 😉 While a force can be applied without movement.
Power = Torque x Angular velocity = T x w [N·m·rad/s] = Watts [W] | 1 RPM equals to 2·PI [rad/s].
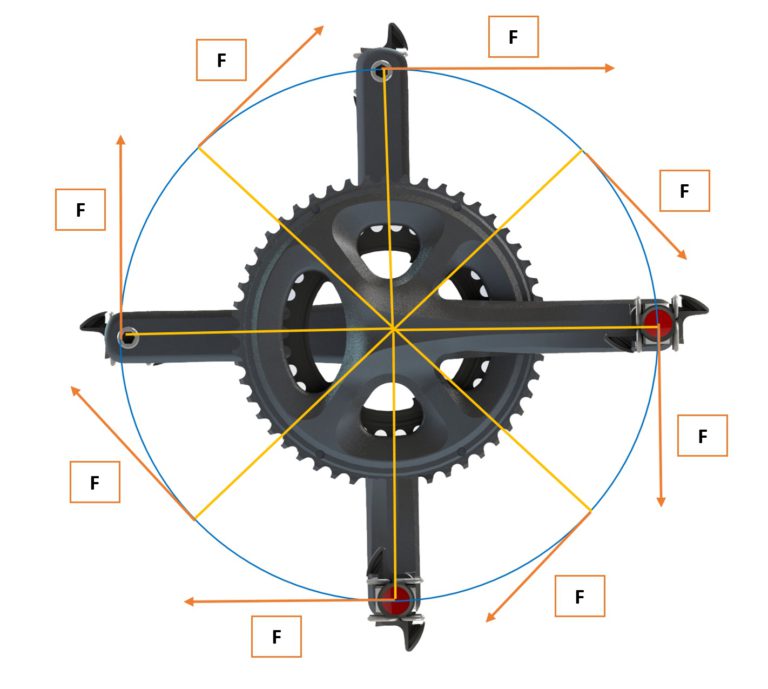
A power meter captures the force applied using some strain gauges (the more it has the better it is) and calculates the average 360º while your cranks turn. In both crank arms or a single one and makes again an average.
In conclusion: You can achieve a higher power by making more force on your cranks or by moving them faster.
What is better? While following a training plan you will learn to succeed on high cadence trainings as well as low cadence trainings. By doing so you start to figure out how feels better, checking your heart rate, effort perception and power. We at TRIMAX are here to help you with that!
Mechanical effort & Efficiency
The next step is to understand that we ride outdoors, what makes appear some elements that in the previous chapter we didn't have into account. It's the wind, the gravity, our bike components resistance and the rolling ressistance of our tires with the pavement.
Our power generates speed on the bike, note that is the first time on the article that we talk about speed 🙂 Some elements are there just to slow us down:
- Gravity: while climbing we go slower than in a flat course, but descending we take advantage of Newton's 9,81 m/s^2. Our weight will impact depending on the grade.
- Aerodynamic drag: while moving forward we are also creating a head wind that will combine with the real wind, all creating a wind vector. This usually slows us more than finding enough tail wind that benefits.
- Rolling resistance: our tires provide us grip but also a friction. It can really make a difference, specially if you still don't have a new wide rim/tire kit.
- Drivetrain resistance: the bearings, chain, lube... The maintenance and bike cleaning can safe you some watts.
Take a look at the power/resistance model that we have drawn for you.

- The most important component in flat terrain is the aerodynamic drag. In these conditions the absolute power [W] is crucial, here our weight is irrelevant. Big cyclists specially with long legs have advantage as they can produce more power by having bigger muscles.
- While climbing the gravity resistance surpasses the aero drag. In this situation the relative power becomes more important [W/kg], so lean cyclists will climb faster.
As you can see, the rolling resistance and drivetrain are a small portion of the cake, of course that can make you go a bit faster, but not as much as training and increasing your power output.
How do I get a cycling power meter?
There are plenty of options to get a power meter, and that depends on how do you spend more time cycling.
If your routine is mainly indoor, we recommend a "smart trainer" also called indoor trainer or turbo trainer. But if your journey is mostly outdoor then you need to install one in your bike.
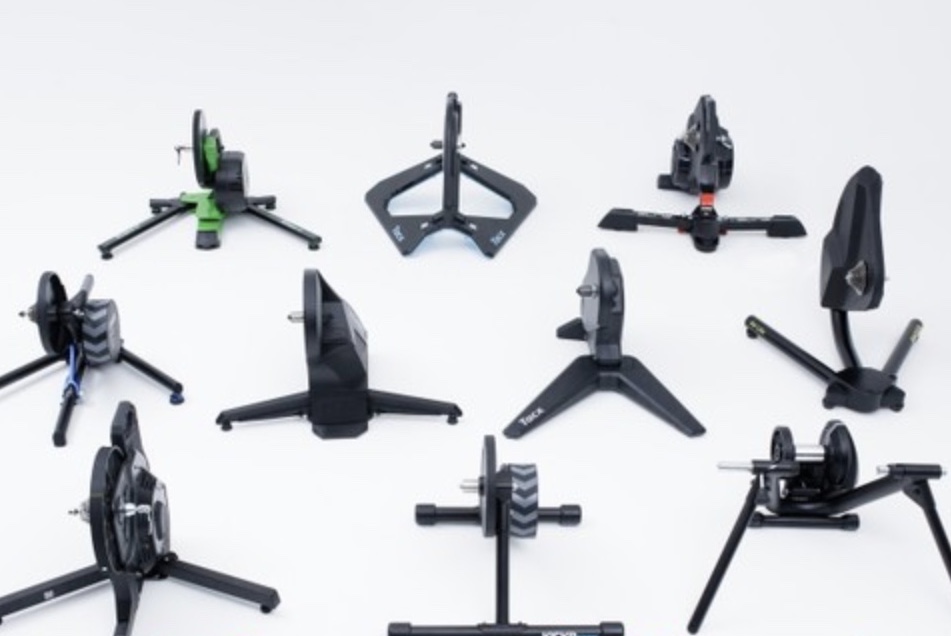
We highly recommend to invest in a "smart trainer" which means that our Training Peaks workouts can be followed directly in your indoor trainer just positioning your chain at half drive train, and letting a 3rd party APP to adjust automatically your turbo trainer.
Within the smart trainer segment, we also can find the "direct drive trainers", those with a cassette to attach directly your bike, avoiding the friction of the rear wheel.
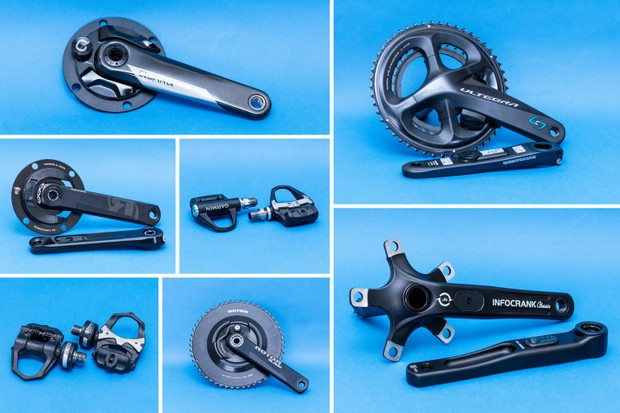
- The pedals based power meters provide flexibility for cyclists with two bikes (Road & TRI) because of its easy exchange. But pedals are more exposed in case of a crash.
- The left crank power meter can be a cheap option if you own a shimano crankset, although some manufacturers sell the full crankset too.
- Our favourite option is the "spider" power meters because they provide good readings and are less sensitive to terrain bumps for example. They require more installation but is not rocket science.
In the long term, all of our cyclists/triathletes own an indoor trainer and also a power meter on the bike. In between some of them start by buying the street power meter and use it with a cheap indoor trainer. Others start with the power based indoor training before purchasing the street power meter.
Tell us your case and we can help to find the best option 🙂
FTP - It's all about the threshold
We are happy with our power meter purchase! What now?
Your coach will perform some initial testing and set a power zones for the workouts. We need a reference point where we can say: "From here is harder and below that it's easier".
This reference is called FTP - Functional Threshold Power, and this point is set in the transition between our aerobic/anaerobic physiological energy system. So the only real way to know that point is through a physiological test like a gas exchange VO2 test or blood lactate samples.
The gold standard is the VO2 test, although usually it's performed in conjunction with lactate strips, so we can use that information while doing our trainings because it's more common that the athletes own a lactatate analyzer than a VO2 analyzer at home.
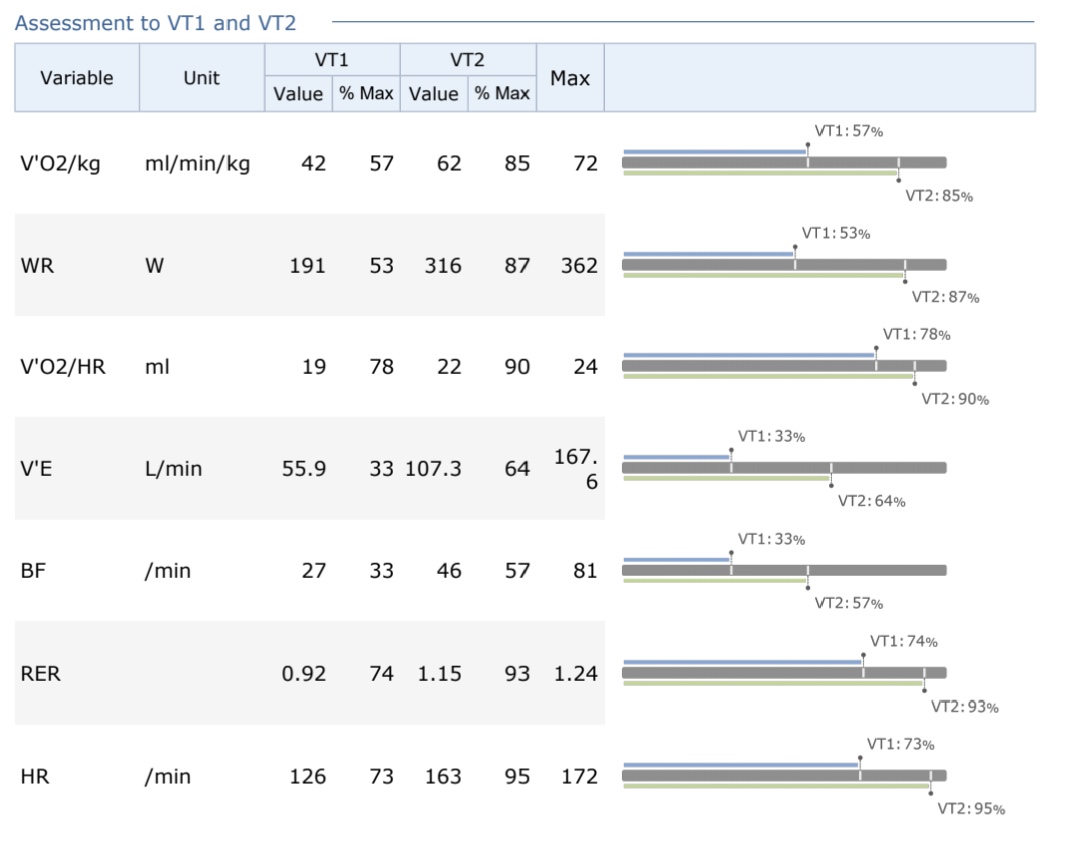
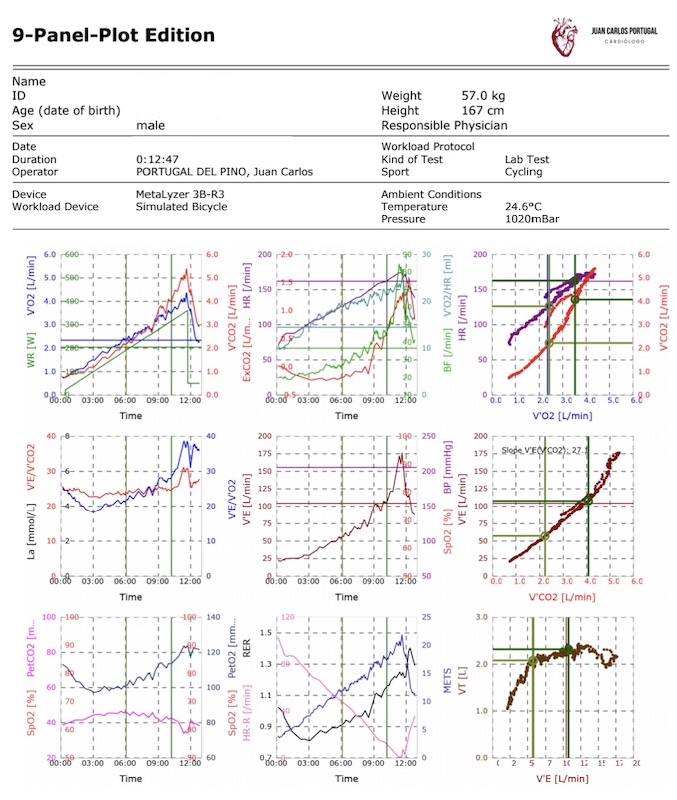
We can share a LAB VO2 test report from Dr. Portugal, performed to one of our cyclists. The report tells us information about the VT1 (aerobic threshold), VT2 (FTP, anaerobic threshold) and VO2max values.
With this information we know that our athlete of 57 kg can use a FTP of 316W for the next training block. The relative value is 5,54 W/kg.
It's not mandatory to perform a LAB test to train with us, although we highly recommend because has a medical check too, we can use other methods to set approximately a FTP for you.
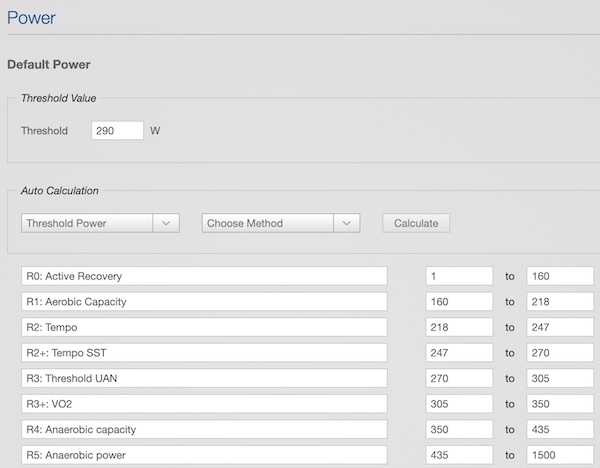
Cycling power zones
Once we know the FTP value either from a LAB or camp test, we proceed to set the power training zones for the athlete.
A benefit of training with power is the resolution that we can achieve by splitting the effort in 8 training zones. Let's see some differences from the HR training zones:
- The power shows the effect of an effort from the first second, while the HR delays the real intensity some seconds, even minutes.
- The HR provides physiological information, while the power can't really tell our fatigue.
- The power allows us to forecast how much time can we spend at a certain intensity prior failure, thanks to a power duration curve.
Yes we need both HR and power for our trainings! And we are here to help you understand it better.
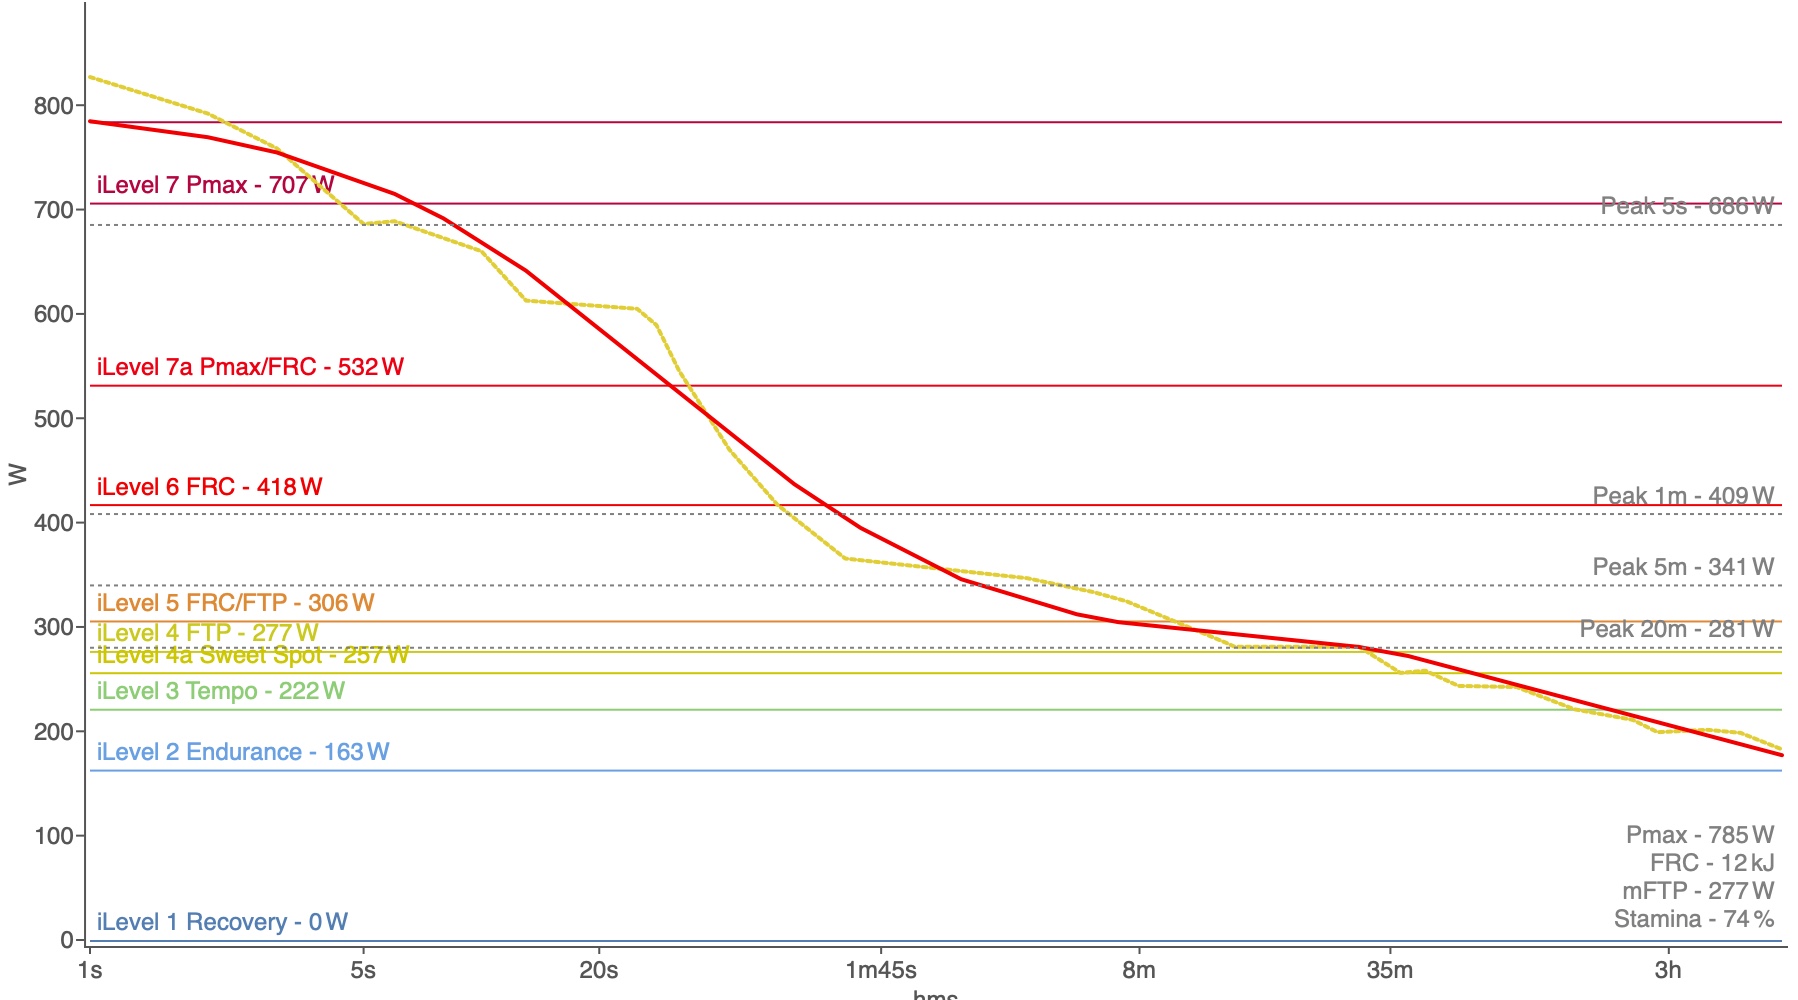
Cycling power duration curve
Once you start training with a power meter, your workouts store data in a historical power duration curve. We can select different time frames for it, although usually the last 90 days is what it counts, as it's recent data.
The iLevels is another naming for power zones from WKO, another APP that we use in conjunction with Training Peaks to analyze your workouts. With this information we can prescribe achievable workouts in the desired target training zone, as well as knowing our strengths and weaknesses.
Metrics related to cycling power
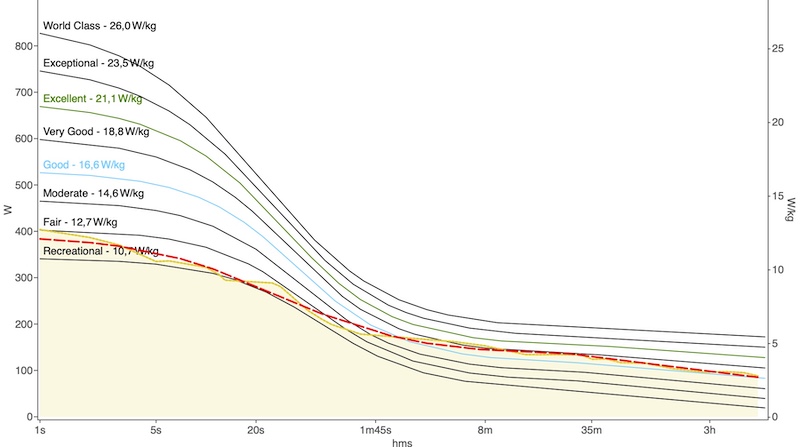
The same power duration curve can be represented in relative power values W/kg.
Do you remember when we talked about the gravity while climbing? With this curve we can know how strong is our cyclist for each time duration.
A cyclist can be stronger sprinting, rolling, climbing, at TT or in long distance triathlongs. Each custom plan that we make focuses to optimize the racing conditions.
Maybe you have heard the term NP - Normalized Power, and creates some confusion. Let's make clear some names:
- P.i - Instant power: every 1'' you generate a power reading, but in your cycling computer device it's better to select the average of the last 3'', 5'' or 10''. We recommend P.10''.
- AP - Average Power: from a period of time selected, all the workout or a LAP that you created for a workout section.
- NP - Normalized Power: it's a formula that makes smooth the AP with the new P.i values. It uses a rolling average formula with the purpose to exclude too low or high values that haven't been hold enough time.
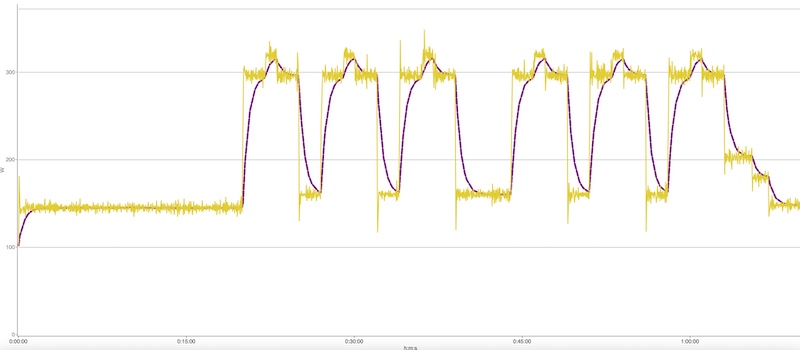
The example above is a workout of 2x 3x(2'-1'-2') of different power intensities.
- The yellow line represents the P.i, here every 1'' independently of your bike computer setup.
- We could create LAPS to analyze some AP, for example the AP of each stage: warmp up, 2', 1', 2', recovery, and again...
- Sometimes we want to simplify the data to analyze so it's more smart to create LAPS to analyze the AP of each set (2'-1'-2'), total of 5' LAPS. The coach gets a clean file with 6 LAPS to review, plus the warm up, recoveries and cool down. Here can be usefull to read the NP.LAP which can be selected too.
- The purple line represents the NP, as you can see it has some delay and has a smoother shape, because when the 1st repetition starts, still has readings from the warm up. Once we do the recoveries still have readings from the reps, until 30'' pass because the NP is a rolling average for the last 30''.
So... When the NP is taken into account?
It's really useful for long efforts over 5min for example or long races like 3-4h for example. It's the "big picture" of the workout as it has polished no pedaling moments or descents. Also it's useful for multi-step sets as we've seen in the example.
CONCLUSIONS
- A power meter provides information about how hard are we pushing our bike, independently of the source of the effort. Power is power and doesn't care if is pushing a light or heavy rider.
- Our physiology will determine our capability to produce force and the cranks speed. The physiology cares if it's a heavy or light rider as well as the fitness level.
- The threshold is a physiological value in terms of VO2, lactate or HR. We can also establish a similarity assigning a power threshold.
- We have different power meter devices: indoor and outdoor, as well as 3rd party APPs that can help with structured trainings.
- Thanks to a power duration curve, our coach can set different training goals according to our needs.